Understanding Teeth Whitening with Mouth Trays
Achieving a brighter, whiter smile is a common goal for many, and at-home teeth whitening with mouth trays has become a popular and effective method. This guide provides a comprehensive overview of how to use mouth trays to whiten your teeth, covering everything from the science behind the process to practical application tips. It’s a convenient and affordable alternative to professional whitening treatments, allowing you to transform your smile from the comfort of your home. By following the steps outlined in this guide, you can confidently embark on your journey towards a more radiant and confident you.
How Mouth Trays Work
Mouth trays, also known as bleaching trays, are custom-fitted or pre-fabricated devices designed to hold teeth whitening gel against your teeth. These trays ensure the whitening agent comes into direct contact with the enamel surface, enabling it to break down stains and discoloration. The trays create a sealed environment, which maximizes the gel’s effectiveness. The trays are an essential component of the teeth whitening process. They effectively deliver the whitening agent, which enhances the results. They make the entire process convenient and manageable, allowing you to incorporate teeth whitening into your daily routine without professional intervention.
The Science Behind Teeth Whitening Gels

Teeth whitening gels work by using oxidizing agents to break down the stain molecules that have accumulated on your tooth enamel. The active ingredients in these gels, typically hydrogen peroxide or carbamide peroxide, penetrate the enamel and dentin. They target the discolored compounds that cause staining. These compounds are then broken down into smaller, less visible molecules, resulting in a noticeable lightening of the teeth’s appearance. The gels’ effectiveness depends on the concentration of the active ingredient and the duration of application. Consistency and proper use will determine the success of the whitening treatment.
Types of Teeth Whitening Gels
The two primary active ingredients in teeth whitening gels are hydrogen peroxide and carbamide peroxide. Understanding the differences between these two helps you choose the right product for your needs. Both agents are effective in breaking down stains, but they differ in concentration and how they work. The choice of which gel to use depends on the desired whitening level, the sensitivity of your teeth, and the specific recommendations provided by your dentist or the product manufacturer. The proper selection of a whitening gel ensures that the process is both safe and effective.
Hydrogen Peroxide Gels
Hydrogen peroxide is a powerful oxidizing agent and a common ingredient in professional teeth whitening treatments. It’s known for its fast-acting whitening properties, often delivering quicker results compared to carbamide peroxide. Hydrogen peroxide is available in various concentrations, with higher percentages typically used in professional settings. At-home kits usually contain lower concentrations to ensure safety. Due to its potency, it can cause sensitivity in some individuals, so using the right concentration is very important. Always follow the product’s instructions to avoid adverse effects.
Carbamide Peroxide Gels

Carbamide peroxide is another common ingredient in teeth whitening gels. When it comes into contact with water, it breaks down into hydrogen peroxide, releasing the active whitening agent. Carbamide peroxide is known for being more gentle on the teeth and gums, which may make it a better choice for those with sensitive teeth. The concentration of carbamide peroxide often influences how long the gel should be used. It is available in different strengths. This gives users flexibility in choosing a product that aligns with their individual needs. Its slower release of the whitening agent minimizes the risk of sensitivity, enhancing the overall comfort during the whitening process.
Step-by-Step Guide to Applying Whitening Gel
Applying teeth whitening gel correctly is crucial for achieving the best results and minimizing any potential side effects. This step-by-step guide breaks down the process into easily manageable steps. It ensures you can safely and effectively whiten your teeth at home. Before starting, always read and understand the instructions provided with your whitening kit. The individual process can be adapted to your specific product. Proper preparation and careful application help you get a brighter smile safely and successfully.
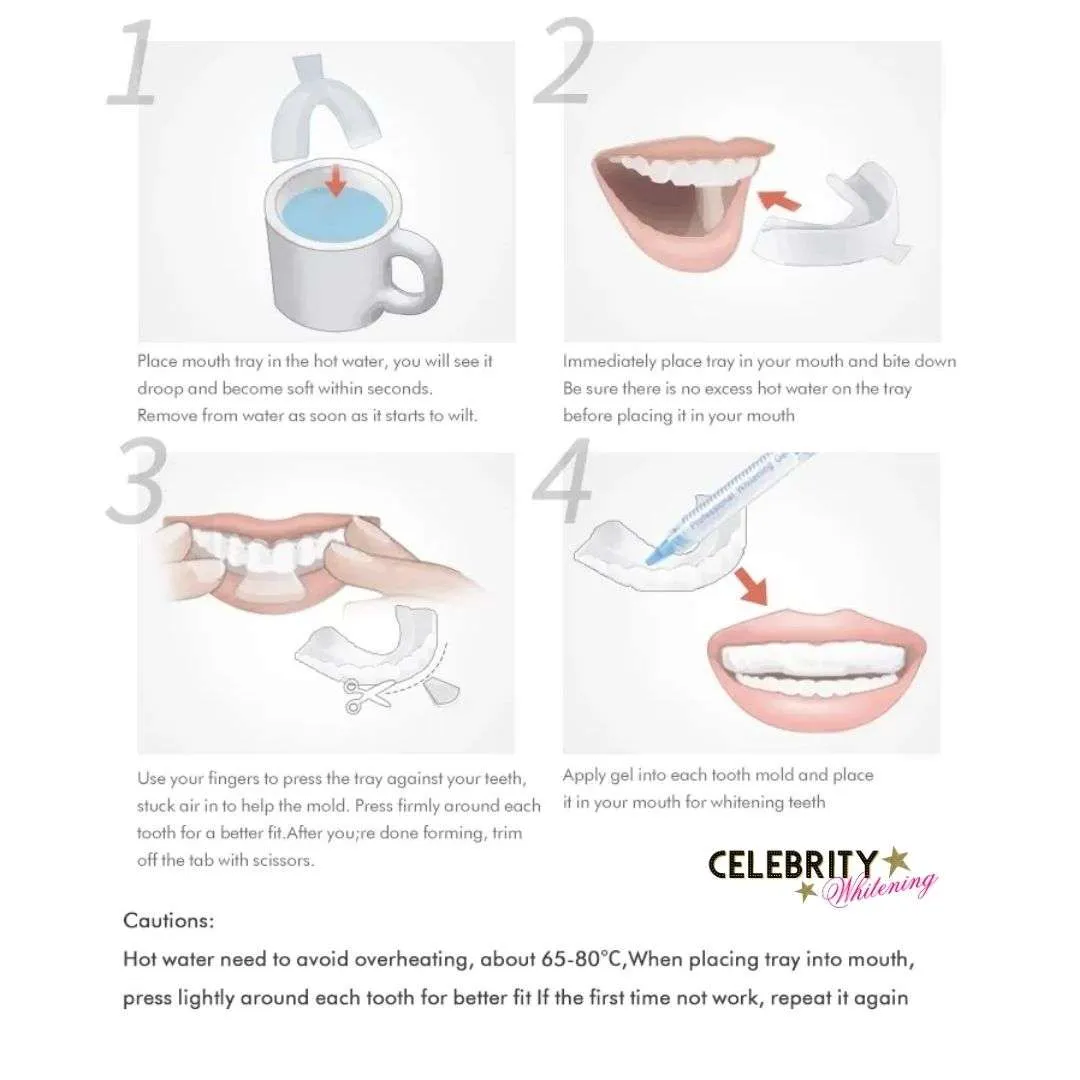
Preparing Your Mouth Trays
Before you begin, inspect your mouth trays to ensure they’re clean and free of any debris. This will ensure no interference with the whitening process. Custom-fitted trays, made by a dentist, should fit comfortably without any gaps. Pre-fabricated trays from a kit should be trimmed to fit your teeth, following the product’s instructions. Make sure the trays are dry before applying the gel to prevent it from diluting. Take the time to prepare your trays so that the application is smooth and effective.
Cleaning Your Trays

Thoroughly cleaning your mouth trays is very important. Use mild soap and lukewarm water. Rinse the trays completely to remove any remnants of previous gel applications or saliva. Avoid using hot water, as it can warp the plastic. Let the trays air dry completely before applying the whitening gel. A clean tray ensures that the whitening agent works effectively and maintains oral hygiene. Proper cleaning helps keep the trays in optimal condition for future use.
Checking Tray Fit
Before applying the whitening gel, it’s important to check the fit of your mouth trays. The trays should fit snugly over your teeth, covering them entirely without impinging on your gums. Ensure there are no sharp edges or areas causing discomfort. Ill-fitting trays can lead to uneven whitening and potential irritation. If you have custom-fitted trays, make sure they still fit properly. If using pre-fabricated trays, check to confirm you’ve correctly followed the trimming instructions. A proper fit ensures an effective whitening treatment with minimal side effects.
Gathering Your Supplies
Gather all the necessary supplies before you start the application process. You’ll need your mouth trays, teeth whitening gel, a soft-bristled toothbrush, and a mirror. It’s also beneficial to have a timer or clock to keep track of the treatment duration. Consider having a paper towel or cloth nearby to wipe away any excess gel. Having all your supplies readily available streamlines the application process. It will ensure that you can focus on each step without interruptions.
The Right Amount of Gel

Applying the right amount of teeth whitening gel is essential. Overfilling the trays can cause the gel to overflow, leading to gum irritation and wastage of the product. Generally, a small bead of gel along the inner front surface of each tooth impression in the tray is sufficient. Refer to the product’s instructions for specific recommendations, as the amount may vary based on the gel’s concentration and the design of the tray. Start with a smaller amount, and add more if necessary. It is best to avoid using too much.
Applying the Gel to the Trays
Apply the whitening gel carefully to each tooth impression inside the mouth trays. Use the applicator tip provided with the kit to deposit a small bead of gel. Ensure the gel is distributed evenly along the front surface of the teeth. Avoid overfilling the trays. Wipe away any excess gel with a clean cotton swab before inserting the trays. Proper application ensures that the whitening agent is in contact with your teeth without causing irritation.
Inserting the Trays into Your Mouth
Once you’ve applied the gel, carefully insert the mouth trays into your mouth, making sure they fit snugly over your teeth. Seat the trays gently, avoiding any forceful pressure. Remove any excess gel that may have spilled over onto your gums with a clean finger or cotton swab. Follow the product’s instructions for the recommended wear time, which can vary depending on the gel’s concentration and the desired whitening level. Proper insertion ensures the whitening agent contacts your teeth for the correct duration.
The Whitening Process
The teeth whitening process involves several steps. They include preparing the trays, applying the gel, inserting the trays into your mouth, and adhering to the recommended wear time. Consistency and patience are key to achieving the desired results. Be mindful of your oral health during the process and watch for any adverse reactions. Regular assessments of your progress help to adjust your process as needed. Understanding the entire process allows you to effectively and safely whiten your teeth at home.
Treatment Duration
The duration of your teeth whitening treatment depends on the concentration of the whitening gel, the severity of your stains, and the desired level of whitening. Typically, at-home treatments require wearing the trays for a specific amount of time each day, ranging from 30 minutes to several hours, or sometimes overnight. It’s essential to follow the product instructions to the letter to ensure optimal results and minimize potential side effects. Be patient. Results will be visible over several days or weeks, not overnight. Consistent use as directed is crucial for achieving and maintaining the desired level of brightness.
Tips for Optimal Results
To achieve the best results, follow these tips. Brush and floss your teeth before each whitening session to remove any food particles or debris. Avoid eating or drinking anything other than water during the treatment. This will prevent new stains from forming and ensure the gel remains in contact with your teeth. Refrain from smoking or consuming products that can stain your teeth, like coffee, tea, and red wine, during the whitening process. Consider using a whitening toothpaste to maintain and enhance the results. Regular dental checkups will ensure that your teeth remain in optimal condition and maintain your bright smile.
Potential Side Effects and How to Manage Them

While teeth whitening with mouth trays is generally safe, some individuals may experience side effects. Being aware of these potential issues and knowing how to manage them is essential. Most side effects are temporary and can be mitigated with proper care. You can enhance your experience and ensure your oral health remains in great condition. If you experience any severe or persistent side effects, consult your dentist.
Tooth Sensitivity
Tooth sensitivity is a common side effect of teeth whitening. It typically occurs when the whitening gel penetrates the enamel and reaches the nerves in your teeth. This results in a heightened sensitivity to hot or cold temperatures. To manage tooth sensitivity, consider using a toothpaste designed for sensitive teeth, which contains ingredients like potassium nitrate to soothe the nerves. Avoid extremely hot or cold foods and beverages during treatment. You can also take breaks from the whitening process to allow your teeth to recover. If the sensitivity persists, consult your dentist for advice.
Gum Irritation
Gum irritation is another potential side effect that may occur if the whitening gel comes into contact with your gums. The active ingredients can cause temporary inflammation and discomfort. To minimize gum irritation, make sure your mouth trays fit correctly and don’t impinge on your gums. Apply the gel carefully, avoiding overfilling the trays. If you experience gum irritation, reduce the wear time or take a break from the treatment. Rinse your mouth with water or a saltwater solution. If the irritation is severe or doesn’t subside, consult your dentist.
Other Considerations

Before starting any teeth whitening treatment, it’s essential to consult with your dentist. Your dentist can assess your oral health and determine if you’re a suitable candidate for teeth whitening. They can also provide guidance on the most appropriate whitening method and product for your needs. Inform your dentist if you are pregnant or have any existing dental issues. Follow your dentist’s recommendations, and do not exceed the recommended treatment durations. Proper preparation and care ensure that you experience an effective and safe teeth whitening journey.